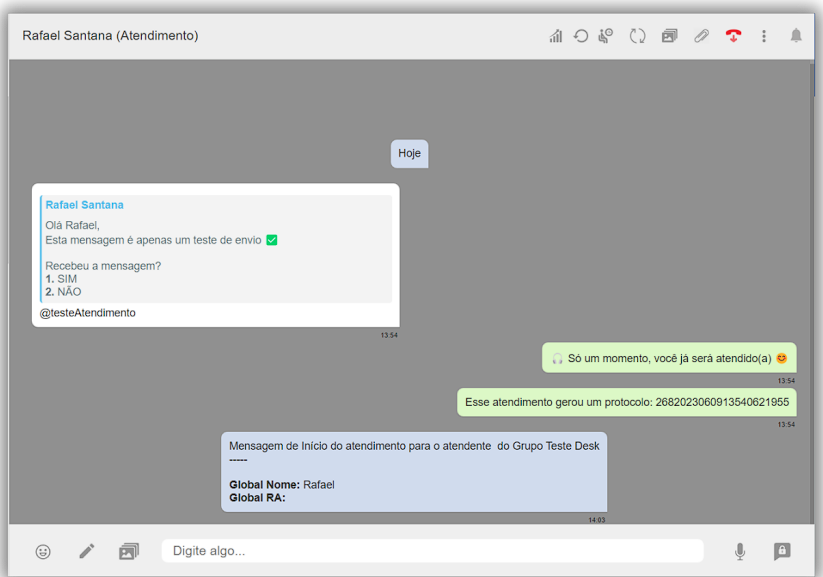
AnnA Notification is a module of anna that allows you to send active notifications to one or more users, either in the form of a number list or by importing a spreadsheet with the numbers to be notified.
It is an active notification sent to the customer through the AnnA platform. This feature allows for more agile and effective communication with the target audience, making it a valuable strategy to optimize customer interaction.
The active message is important for contacting customers, inviting them to a service via WhatsApp, informing them of something important happening in the company, running marketing campaigns, and much more.
We’ve just seen the importance of the active message, now check out the moments when you can use these active messages:
To reactivate expired conversations in progress, you can send the message through the service screen.
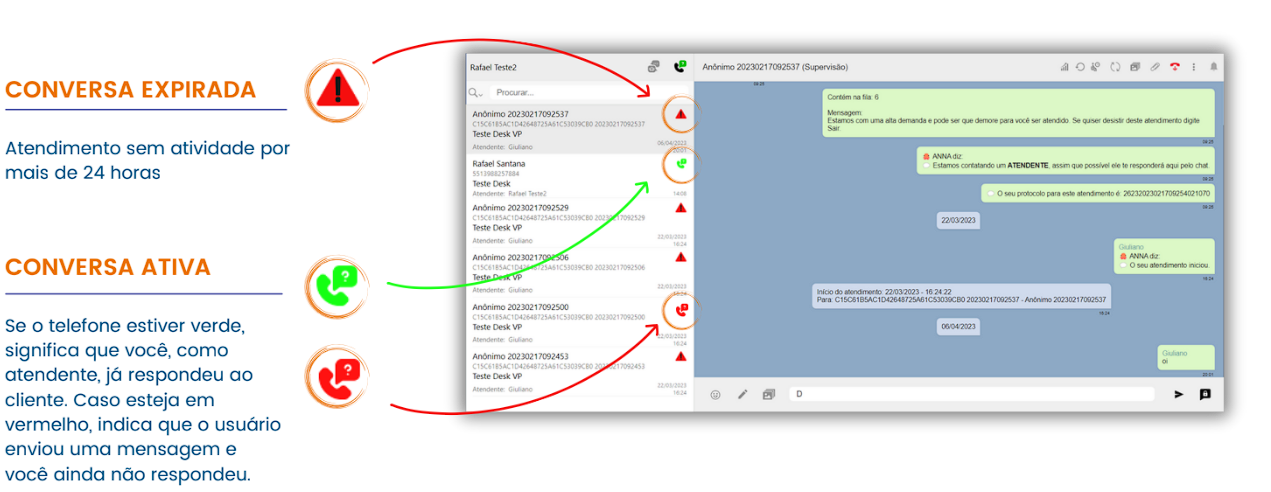
Before proceeding with reactivating an expired conversation, it is essential to understand the concept. When you are involved in an active service, but the customer stops responding for more than 24 hours, the conversation is marked as expired, which makes it impossible to send new messages to this customer.

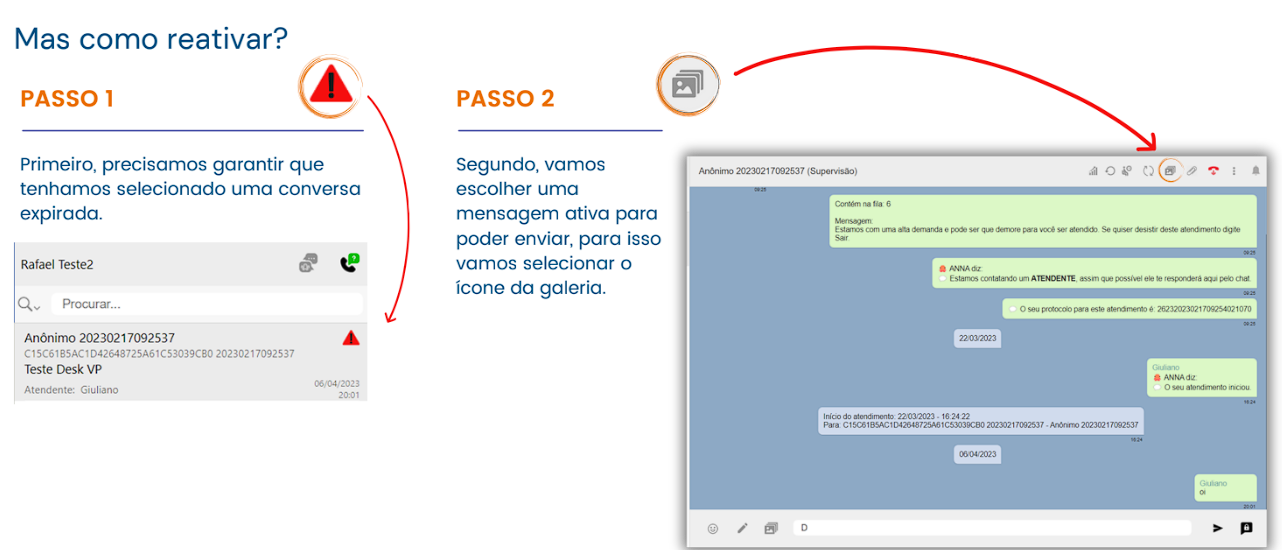
We already understand what an expired conversation is, where we cannot send messages. But how can we contact the customer? It is necessary to reactivate the conversation.
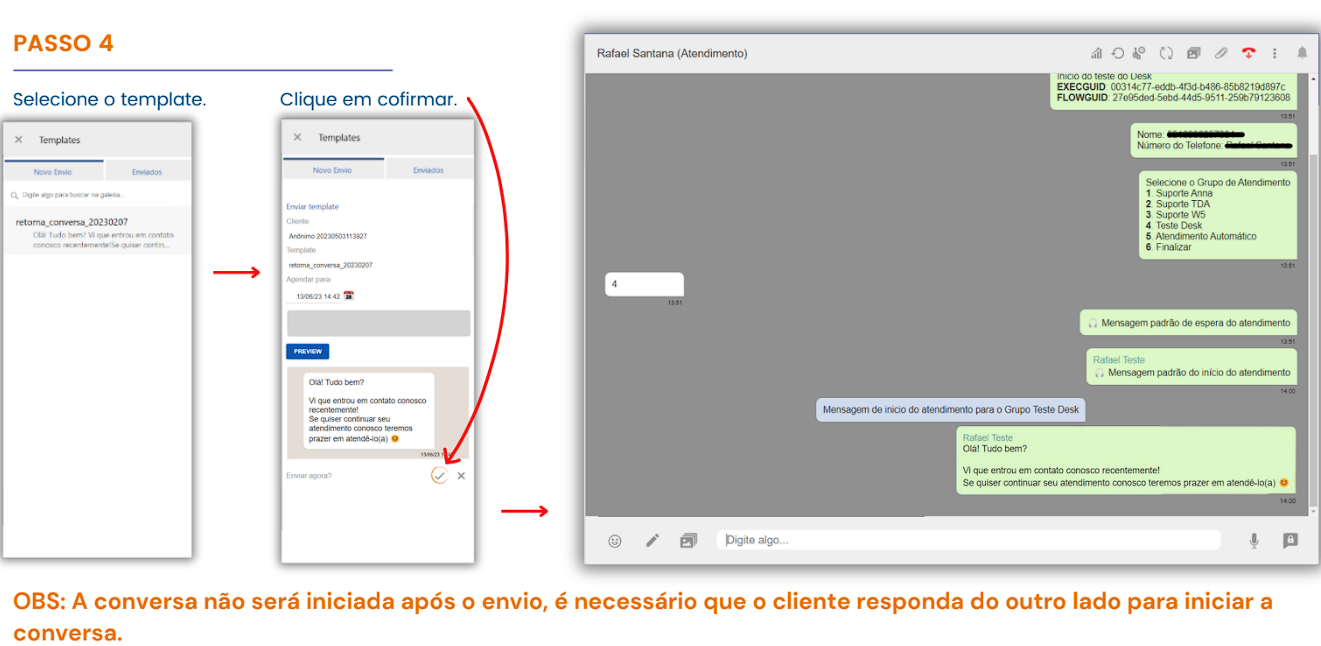
This is the 'gallery' tab.
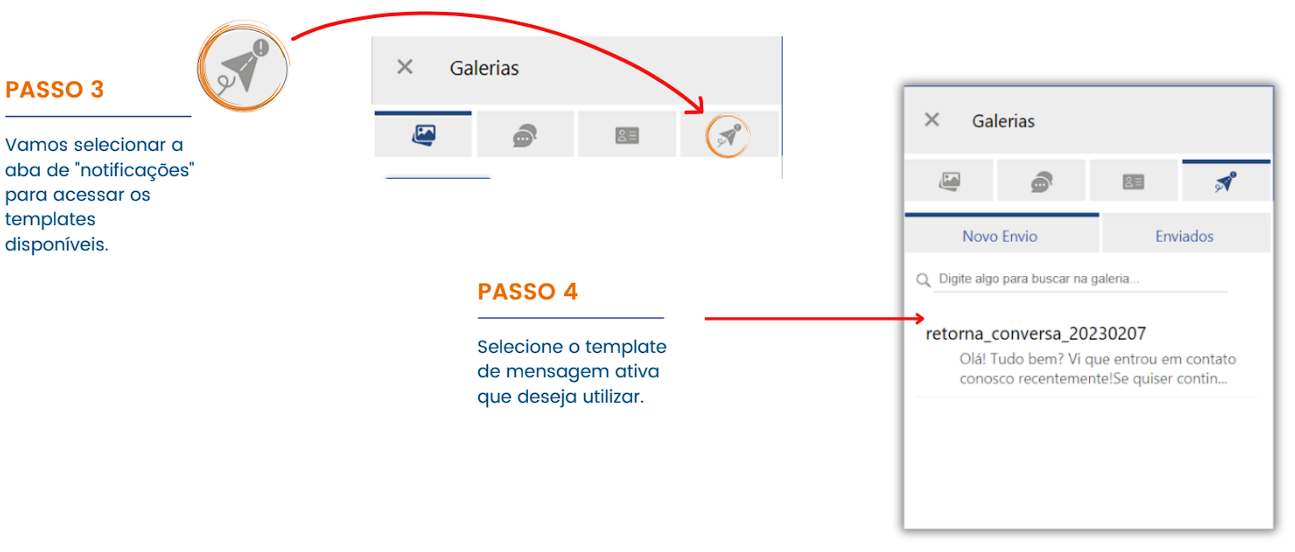
When selecting, you can view a preview of the chosen template.
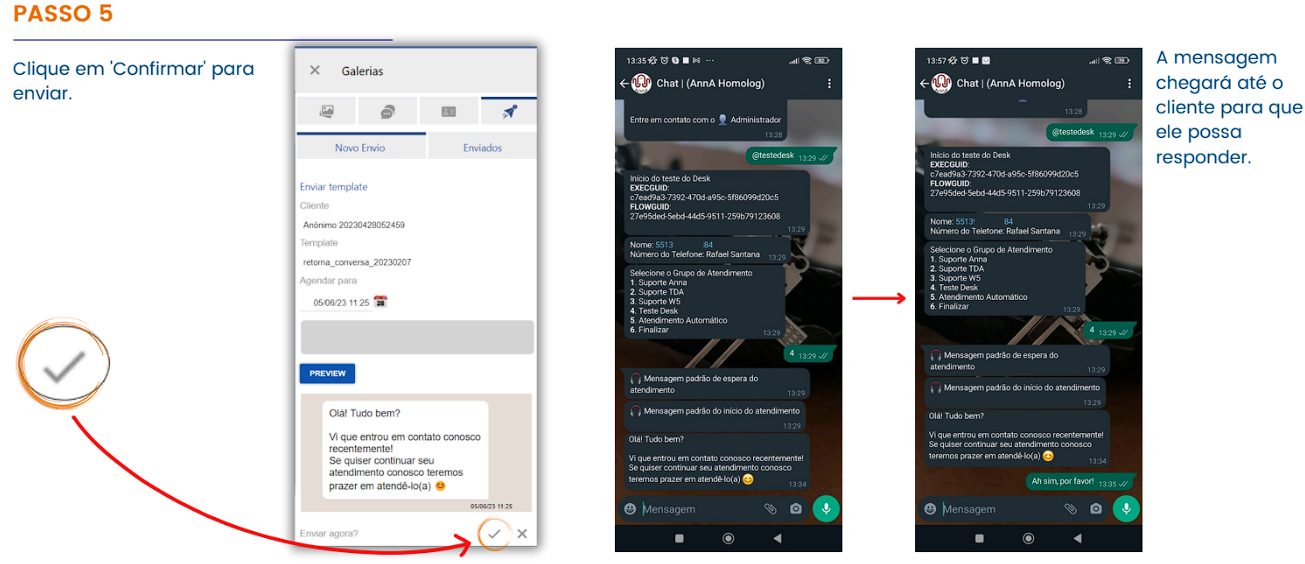
As soon as the customer responds, the conversation will be reestablished.
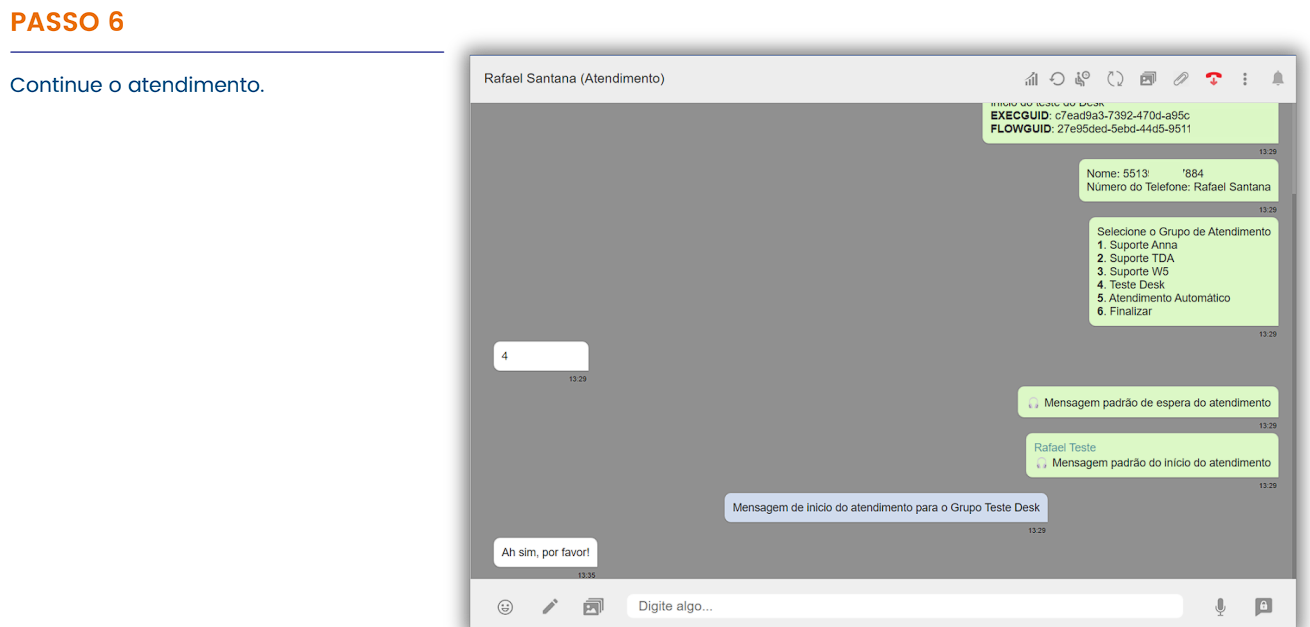
You can reactivate expired conversations in the queue by sending an active message through the service screen.
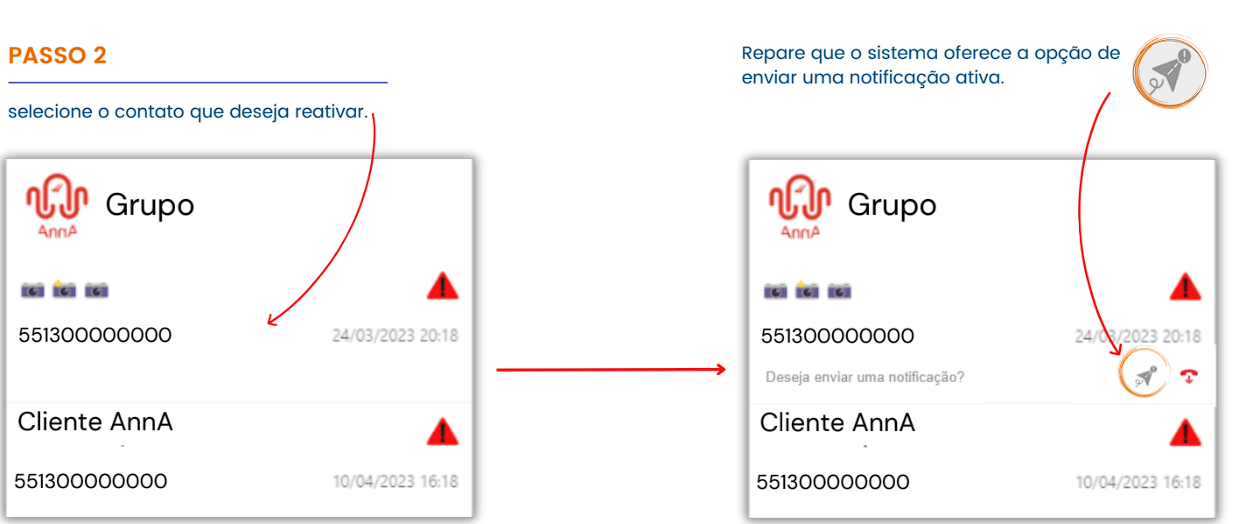
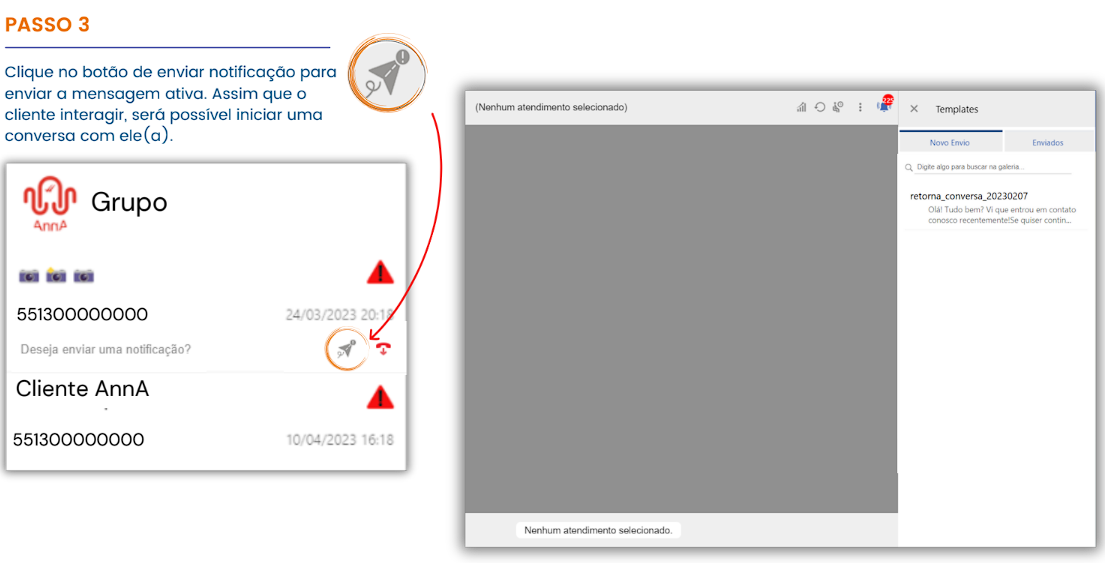
Before sending an active message, it is necessary to identify a contact in the queue that has expired.
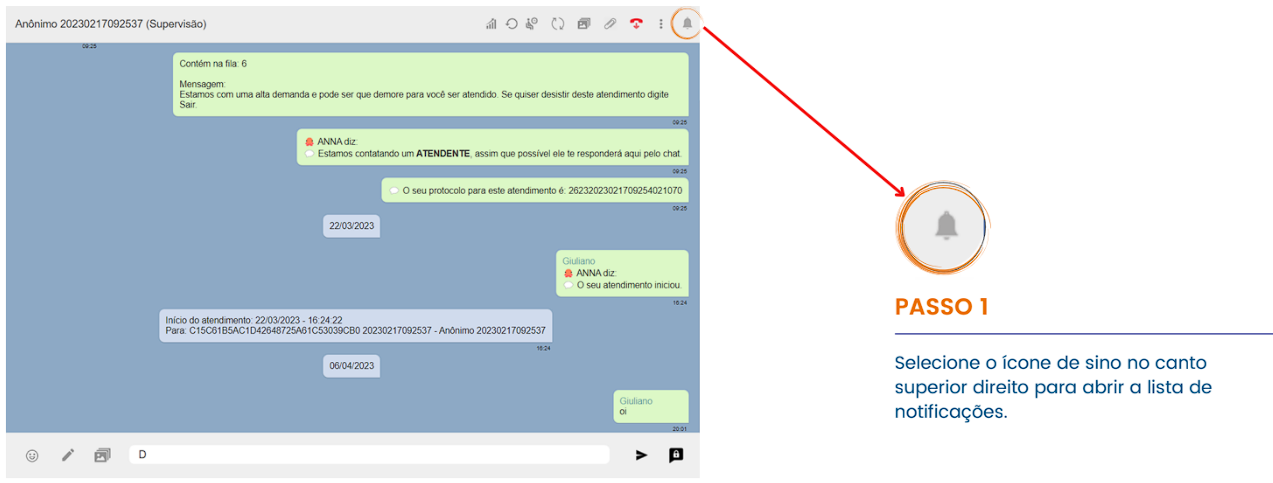
With the notification list open, it is possible to identify the expired conversations in the queue.
This method is widely used when the goal is to reach a large number of customers or leads, whether for announcements, offers, or satisfaction surveys. This strategy is especially useful for expanding your customer base while strengthening relationships with your target audience through personalized and effective actions.
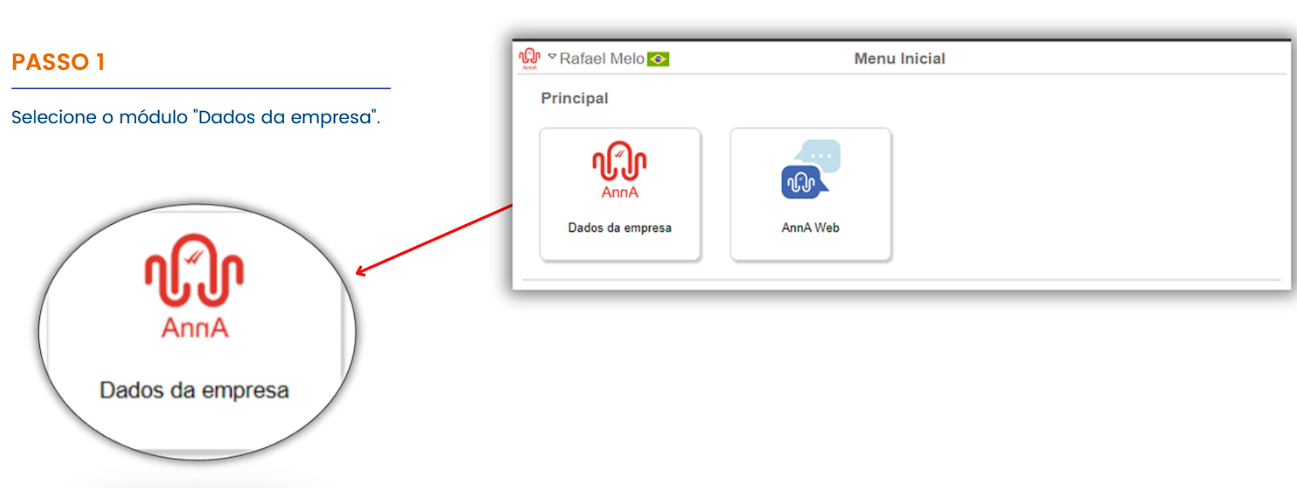
The next way to send active messages is through the “Company Data” module, located on the platform’s home screen.

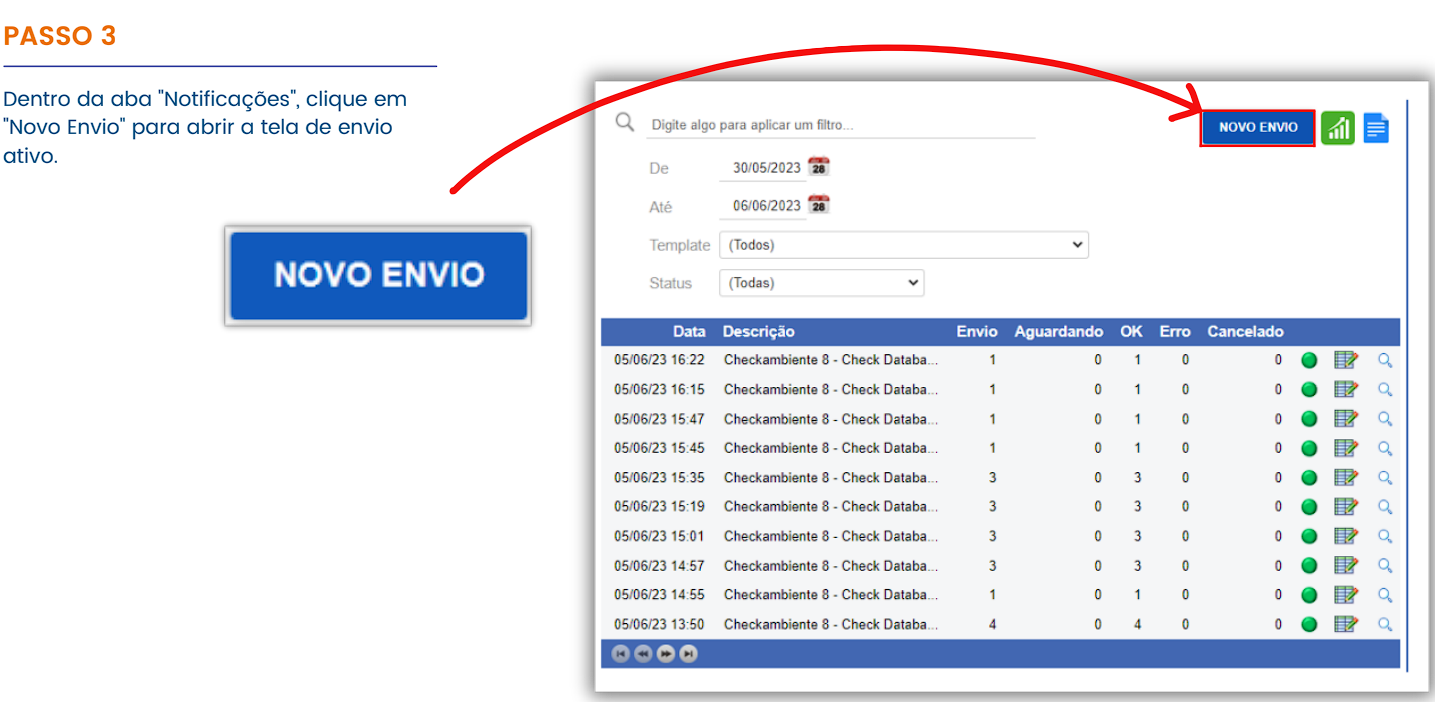
When you click NEW SEND, the Send Screen will appear on the right.
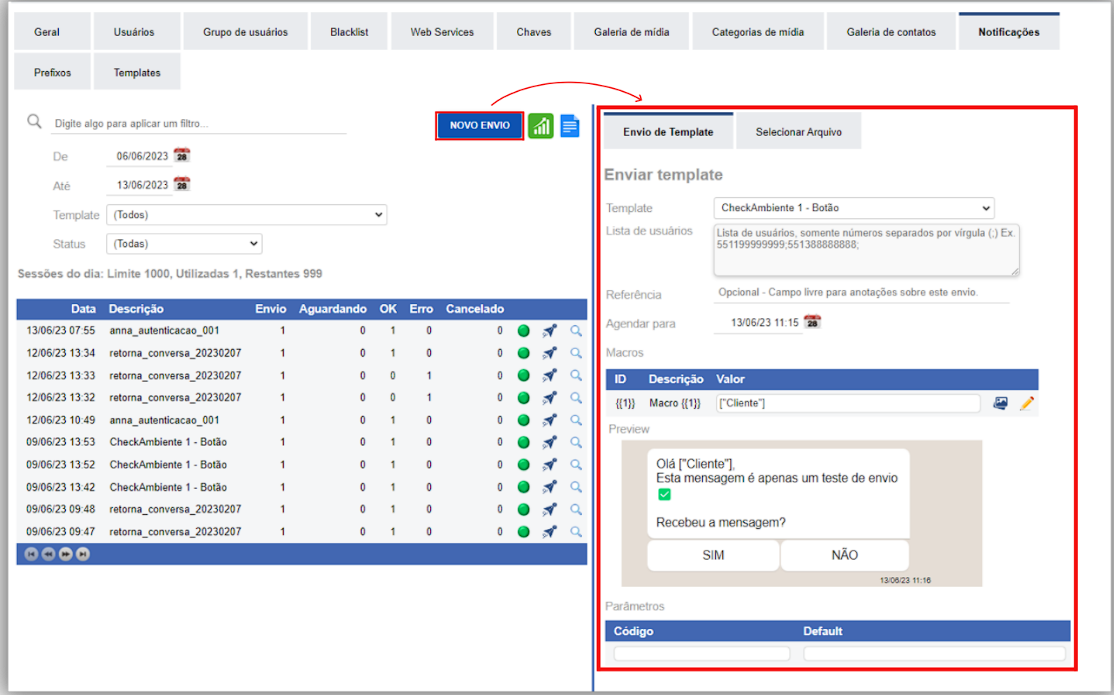
This sending method is highly flexible, allowing the inclusion of contact numbers and offering a template preview before sending.
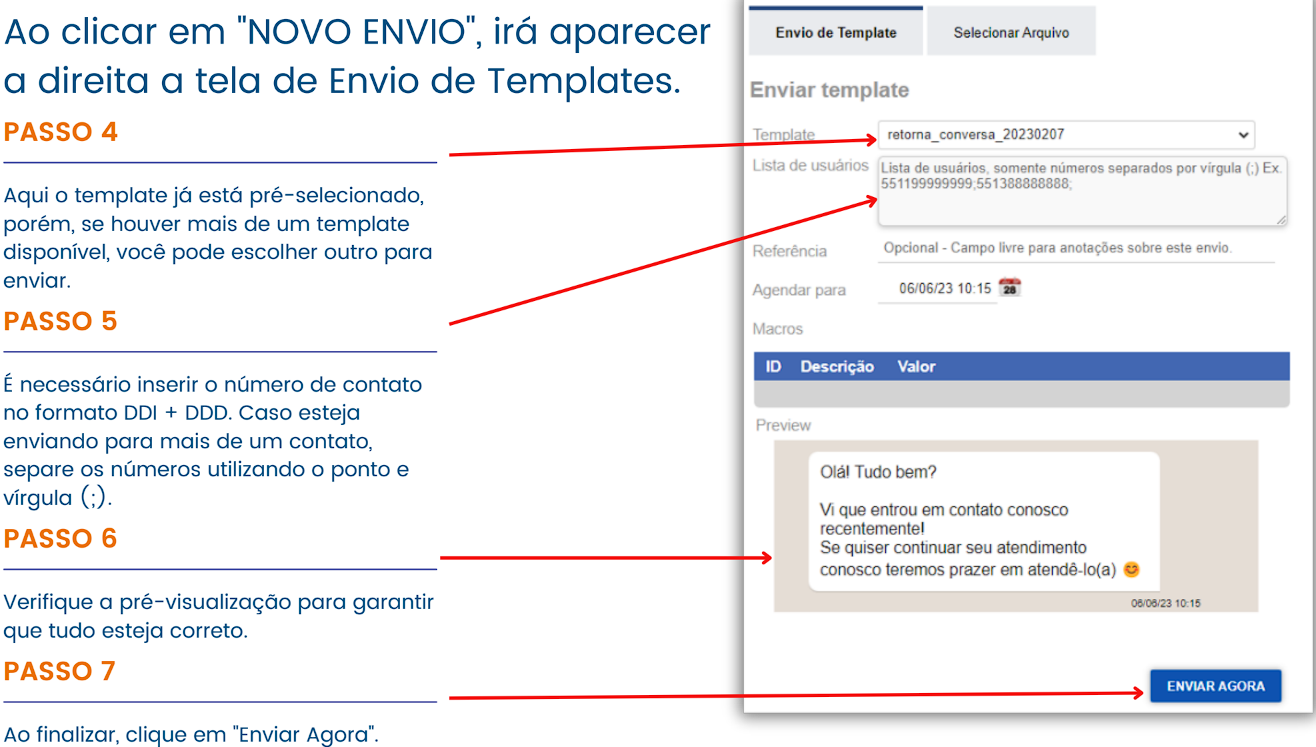
After clicking “Send Now,” you will receive immediate confirmation if the sending was successful or not.
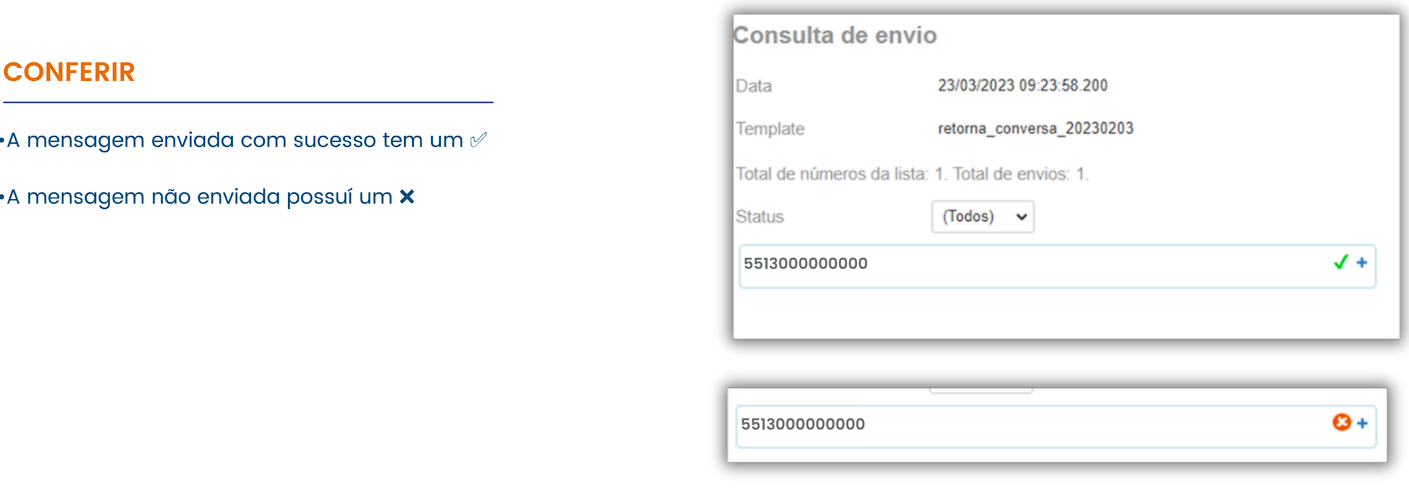
Attention: it is important to note that the processing and forwarding of templates do not occur immediately. After sending, they enter a queue, waiting their turn to be processed and forwarded. You can monitor the status on the same Send screen.

This sending method involves using a pre-formatted spreadsheet containing the user base for whom you want to send the templates.
Bulk sending via spreadsheet is a highly efficient method, especially when it comes to practicality. To use this method, you simply need to export a database into a spreadsheet in the format requested by the system for the template you want to send.
Now that we understand the importance of bulk sending via spreadsheet, let’s explore some illustrative examples. Next, we’ll learn step-by-step how to structure the spreadsheet correctly, ensuring it’s organized and ready for message sending.
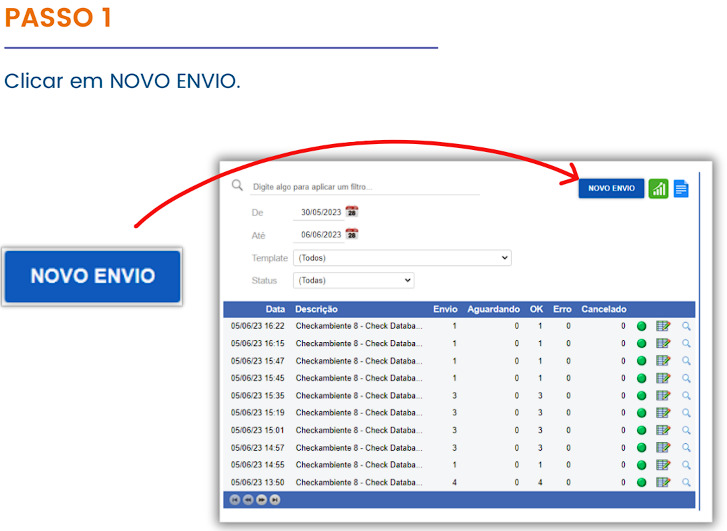
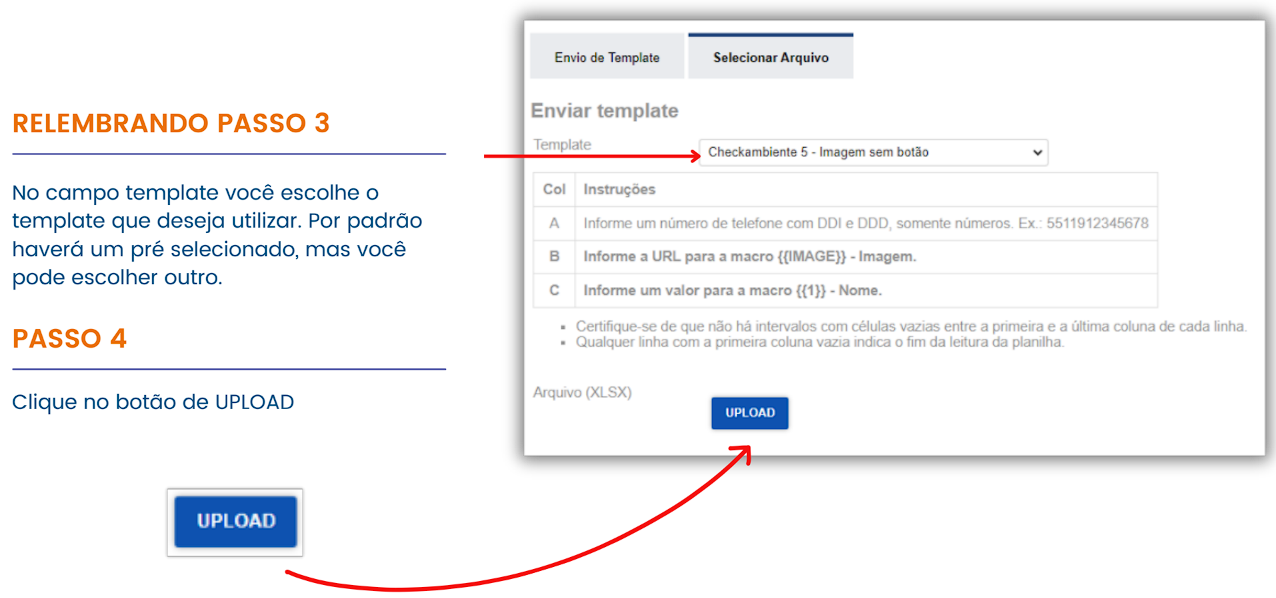
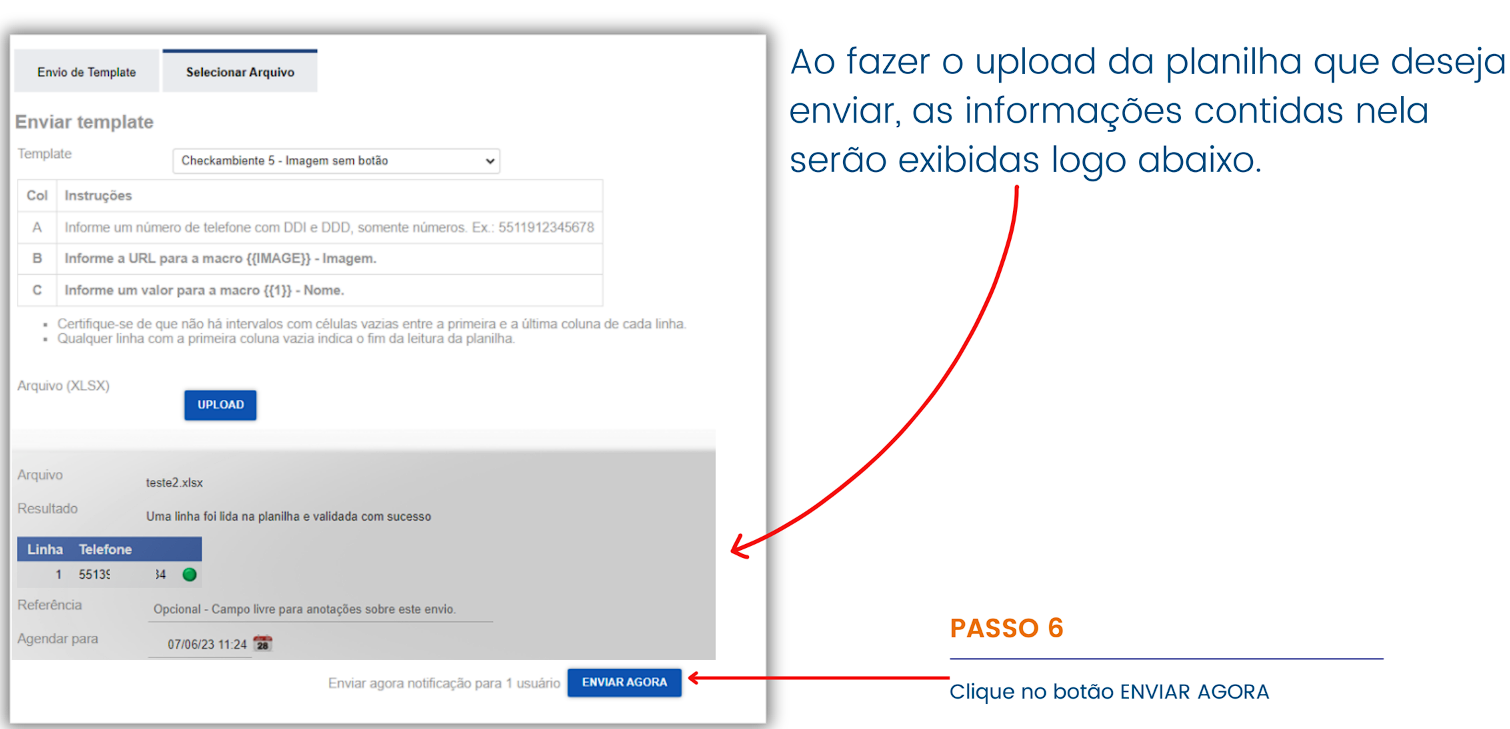
The steps for performing the send are similar to the previous method. However, on the NEW SEND screen, we will select the SELECT FILE option to send the template through the formatted spreadsheet.
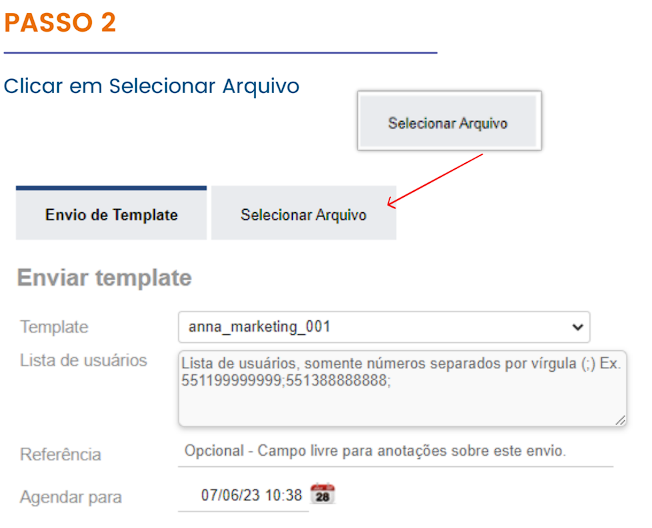
This is the specific screen for sending templates via formatted spreadsheet. Here, you can select the spreadsheet file that contains the user data for the send.
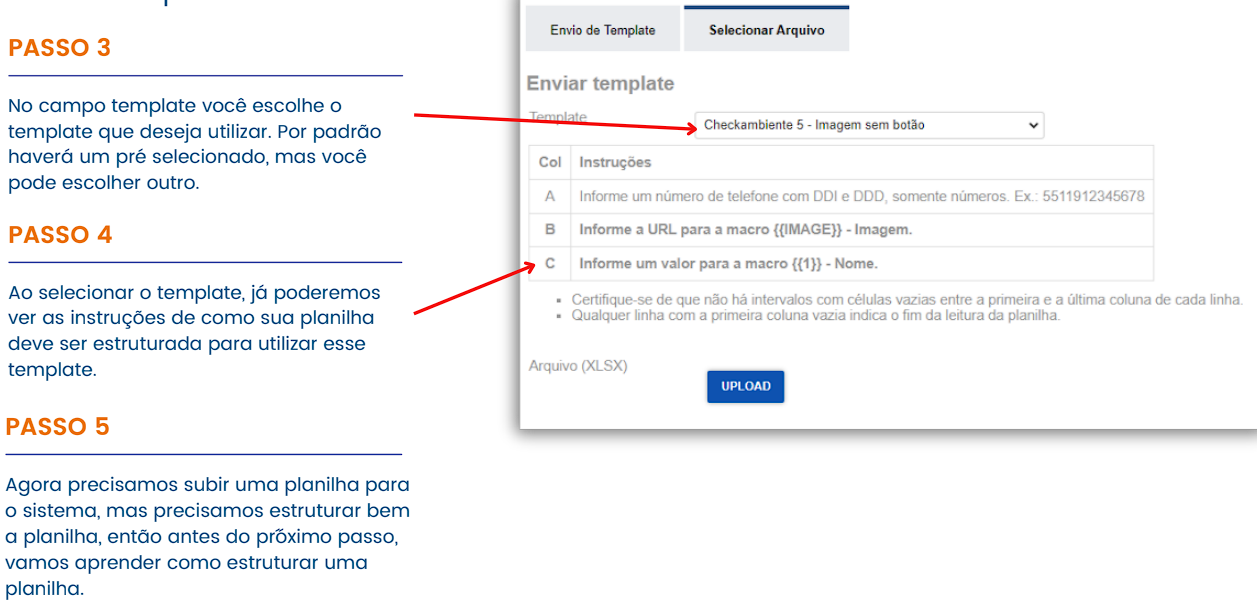
The spreadsheet structure must comply with the selected template. It is essential to follow the spreadsheet structuring instructions provided when selecting the template. Below we will have examples of how to properly complete this process.
The sending spreadsheet is a powerful tool for sending automated messages. Follow some specific instructions to use it correctly:
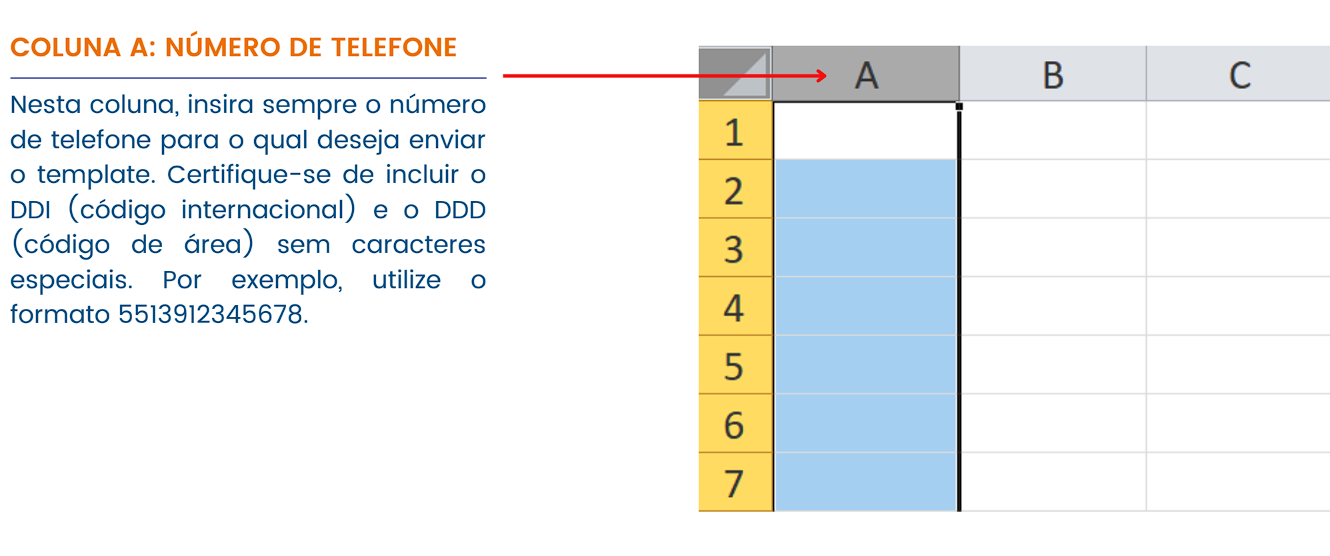
The phone number in the first column is essential to identify and contact the customer when sending messages.
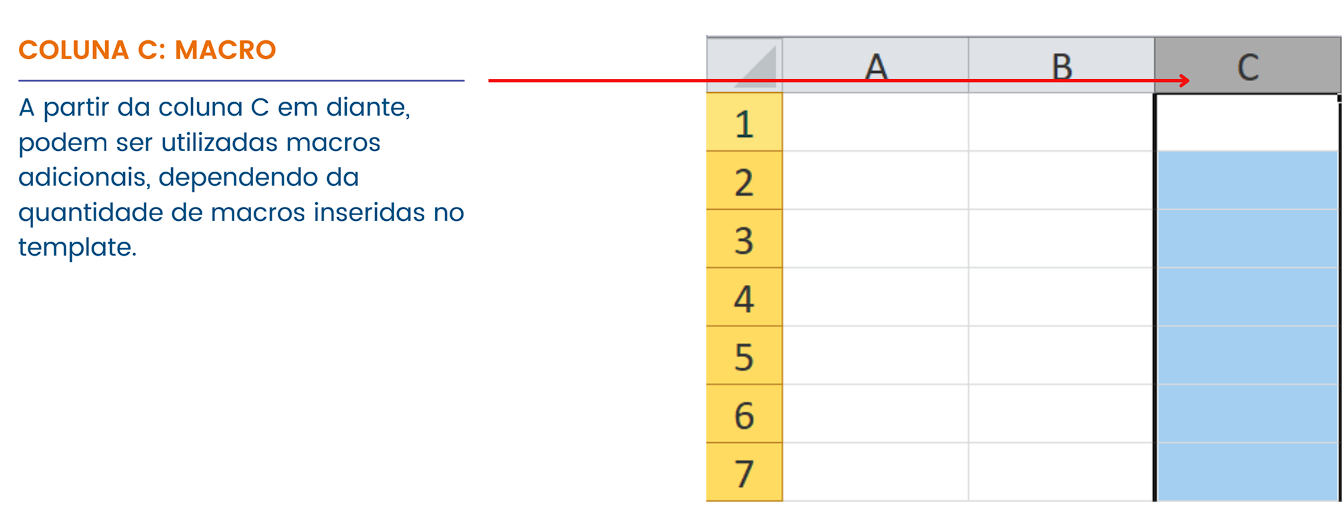
Macro substitution is a technique to replace keywords or variables with specific values in a text. Macro substitution offers the freedom to personalize and adapt the content.
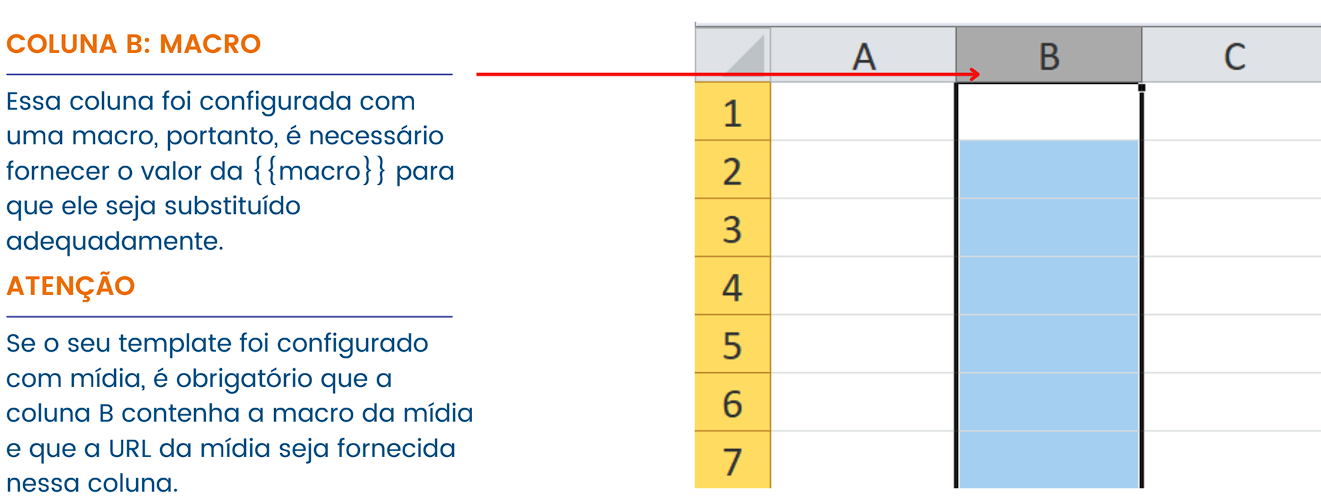
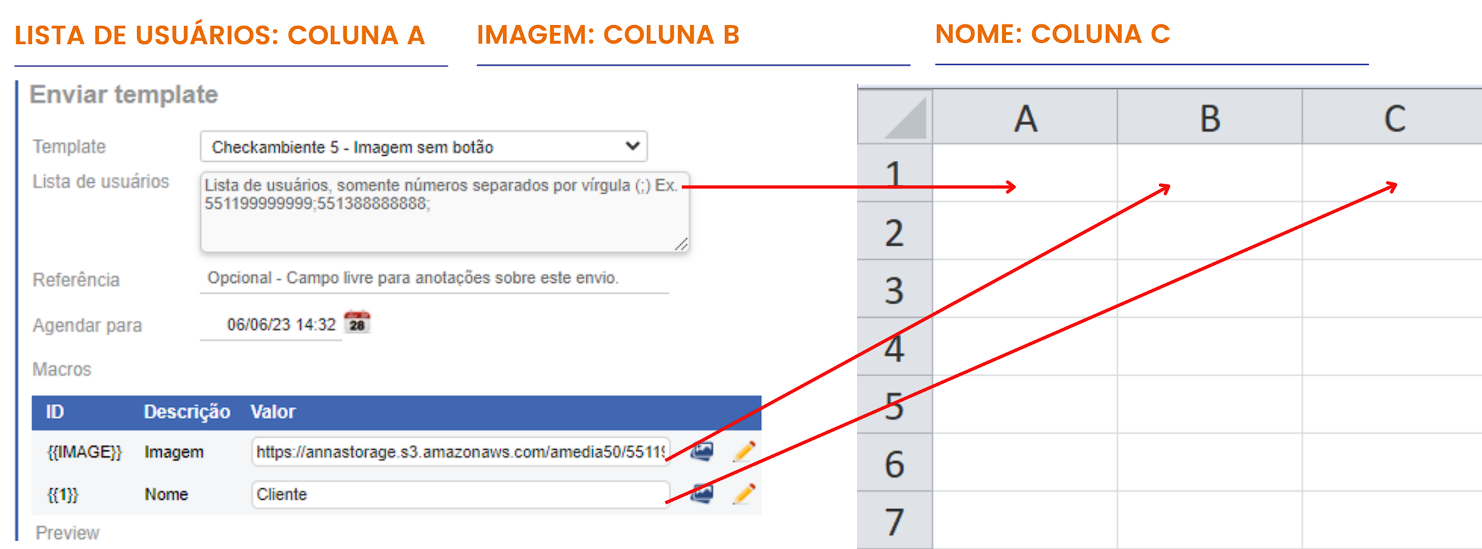
In this way, the message arrives at the customer with the macros properly replaced.
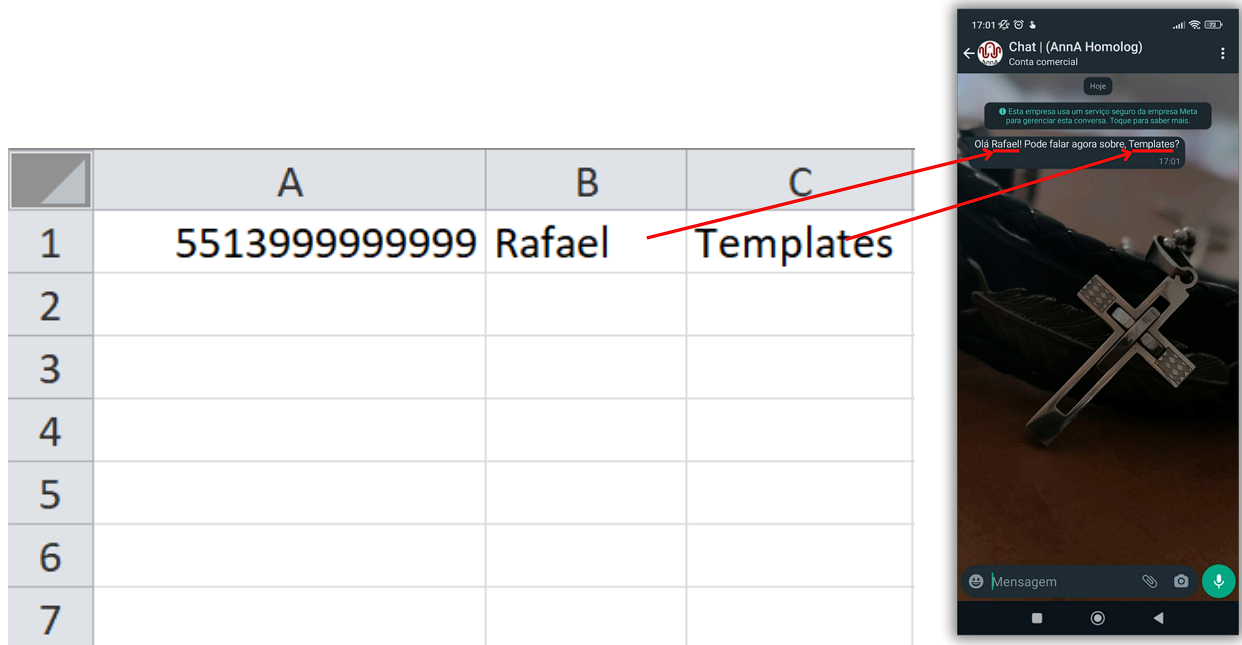
Now that we know how to structure the spreadsheet, we can proceed with the bulk send.
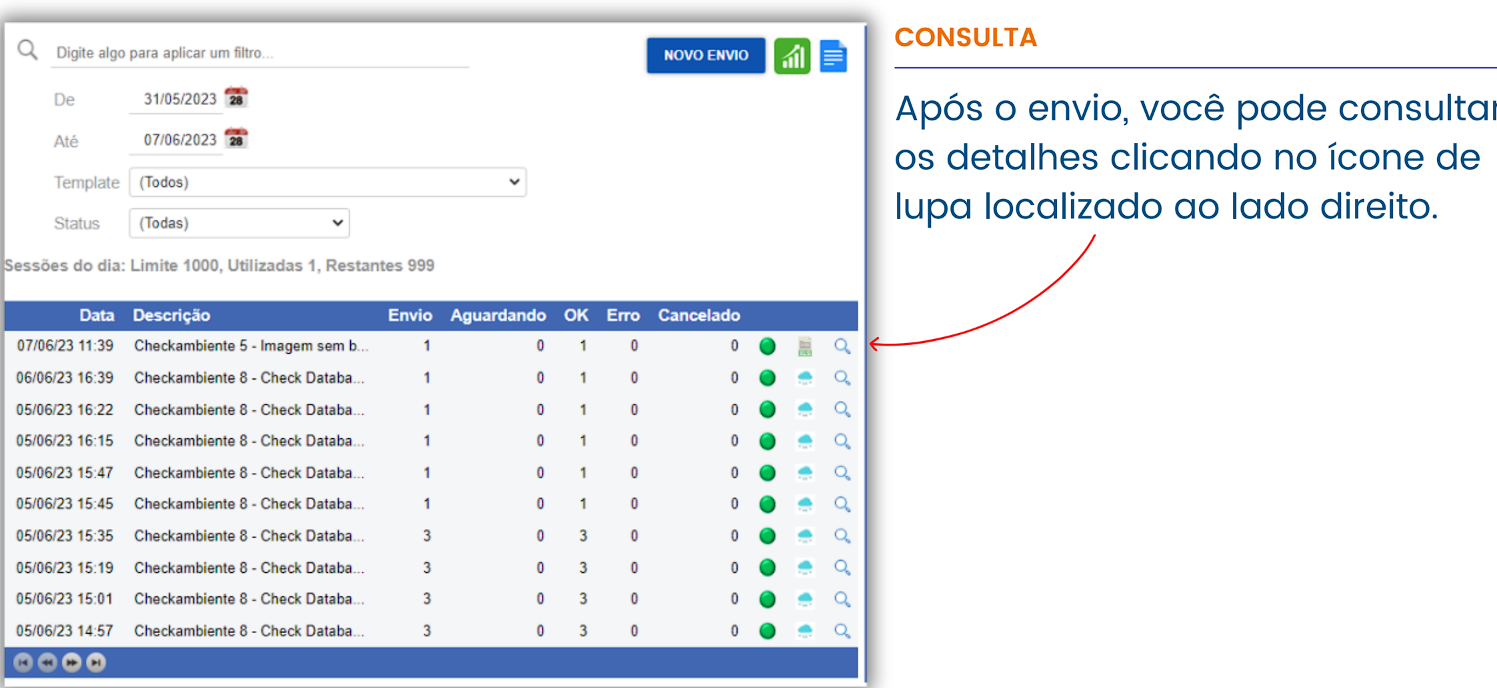
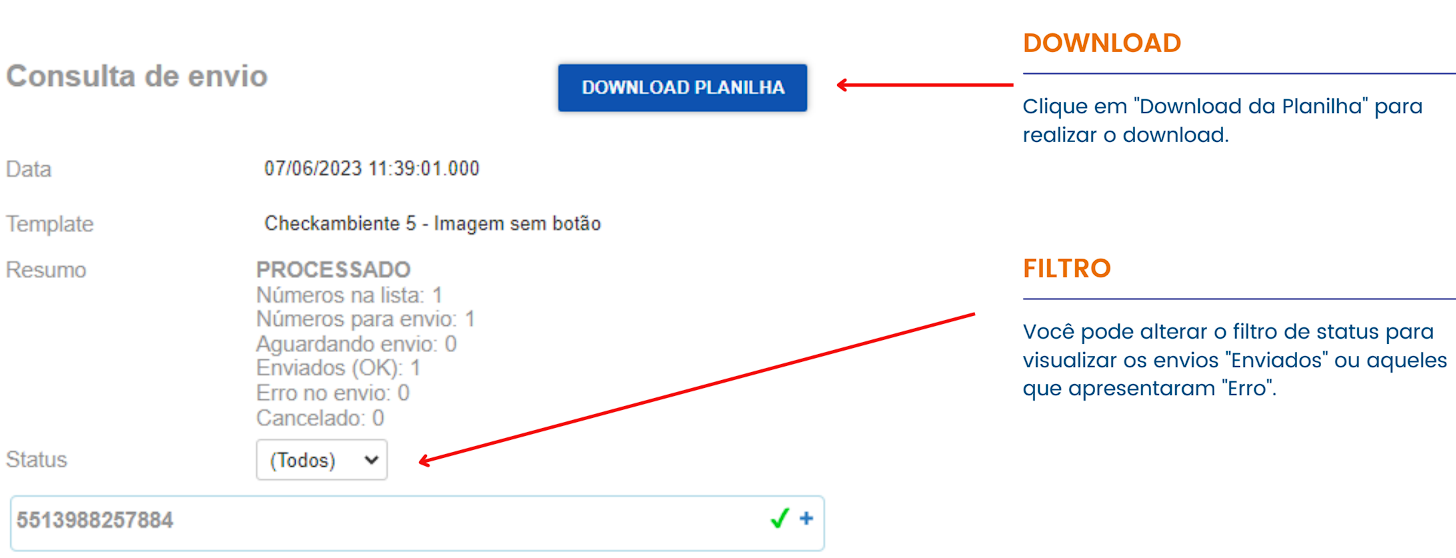
On this screen, you have access to the sending status information and can also download the spreadsheet.
Send active messages to completed services and resume communication with customers.
In the context of active messages, we have the ability to establish communications with customers even after a service interaction has ended. This means that, even if a previous conversation has been completed, it’s still possible to start a new interaction with the customer via active messages.
This feature offers the opportunity to reconnect with customers and establish new conversations, whether to provide additional support, share relevant information, or offer new products or services. With active messages, it’s possible to maintain continuous and effective communication with customers, ensuring that their needs are proactively and personally addressed.
To find a completed interaction, you first need to access the platform. Let’s go!
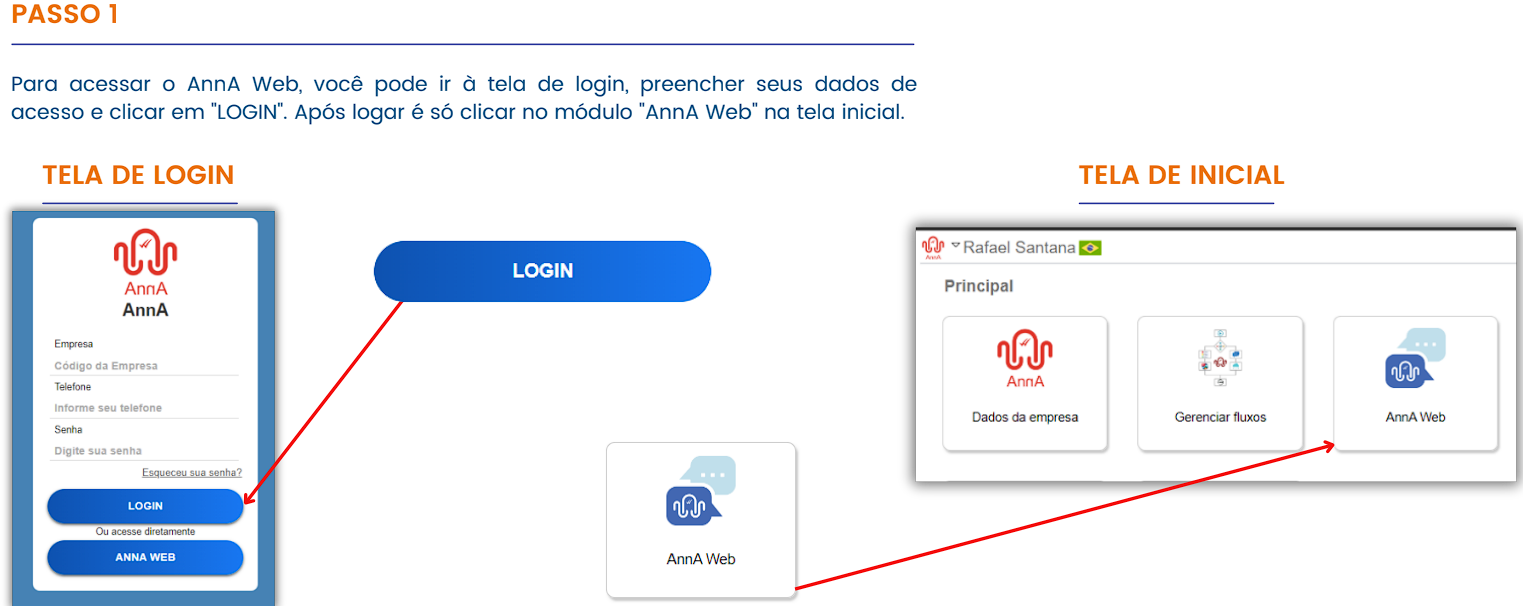
Now that we are on the AnnA Web screen, we need to filter the completed interactions.
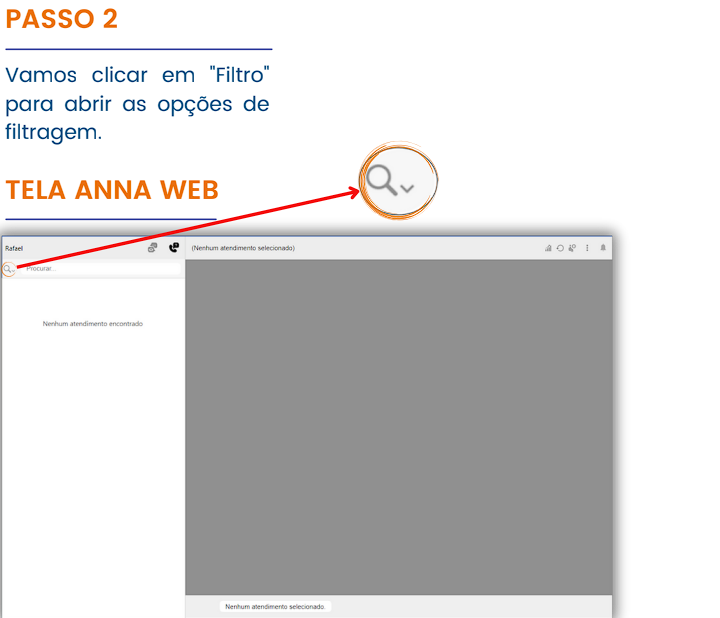
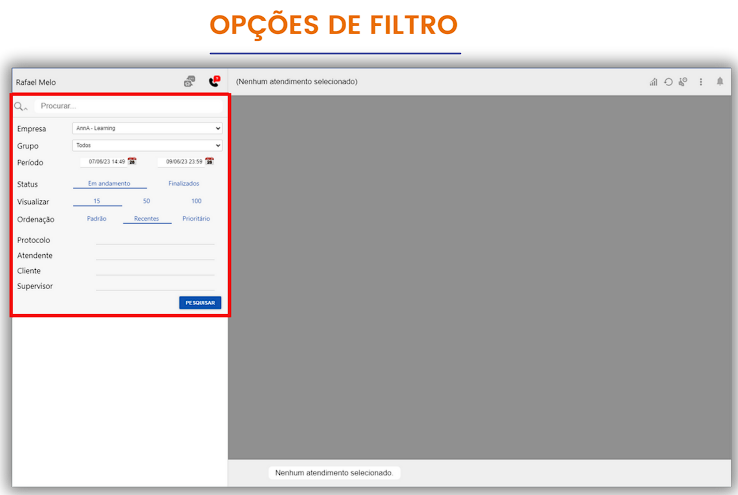
We need to apply the filter to display the completed interactions.
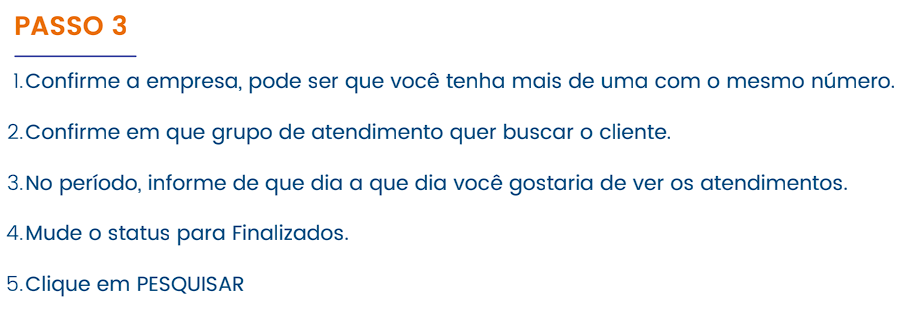
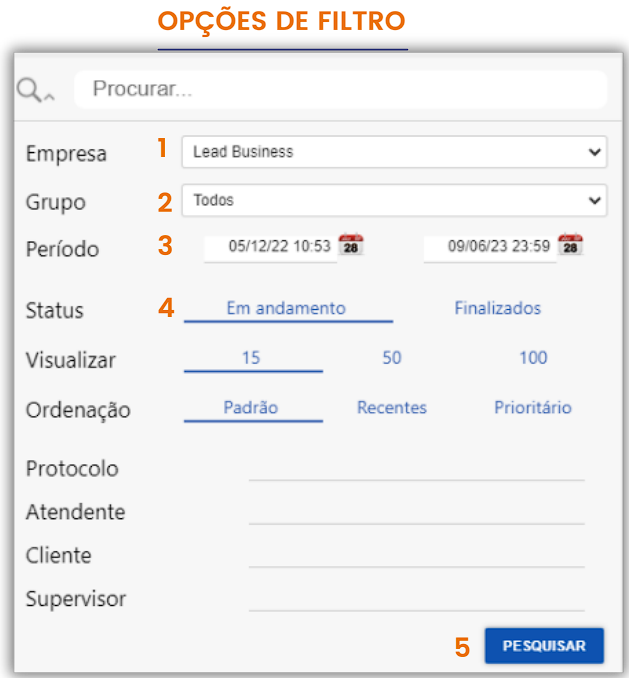
Now that we’ve filtered the completed interactions, we need to select the conversation we would like to reactivate.
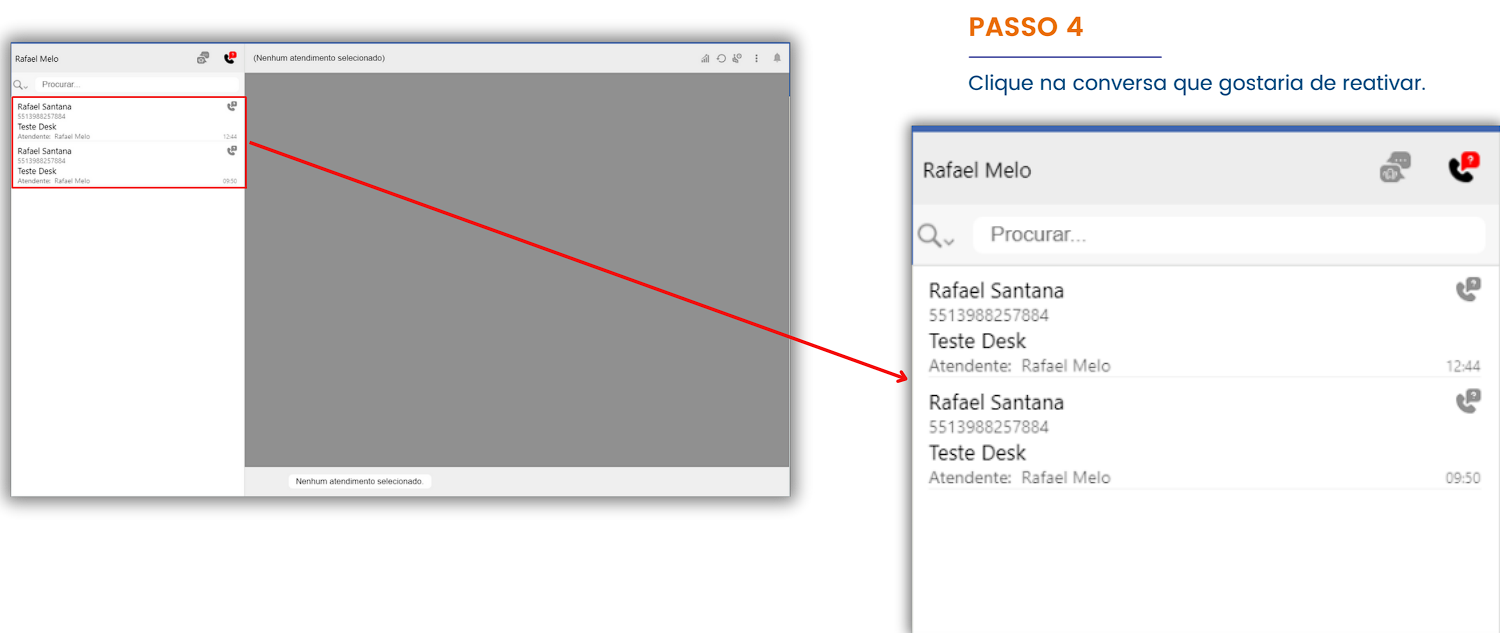
With the conversation selected, we need to send an active message.
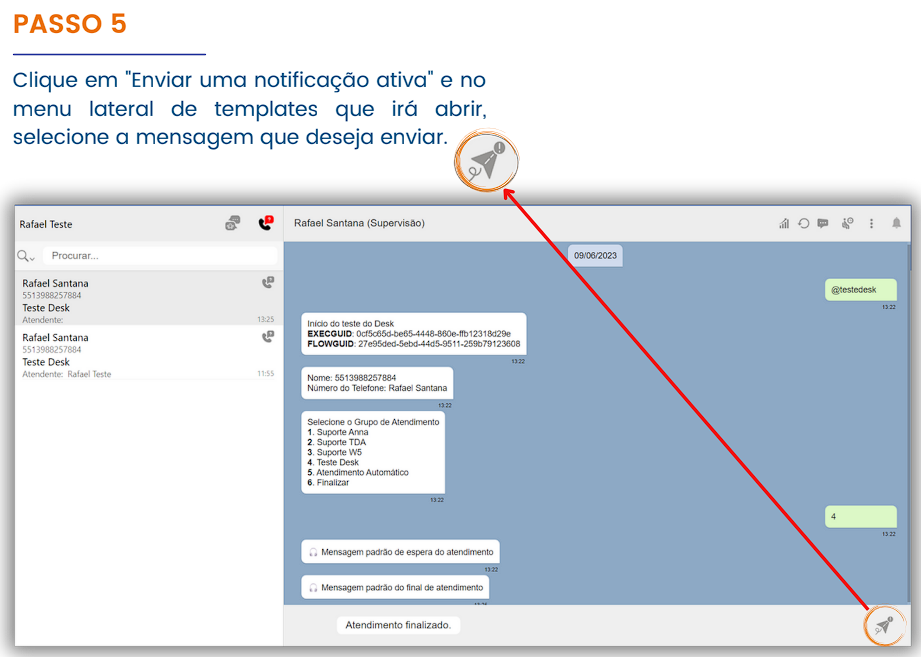
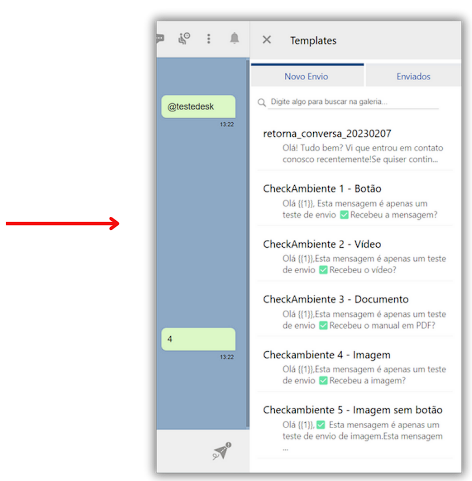
After selecting the active message you wish to send, you will see a preview and can confirm the message sending.
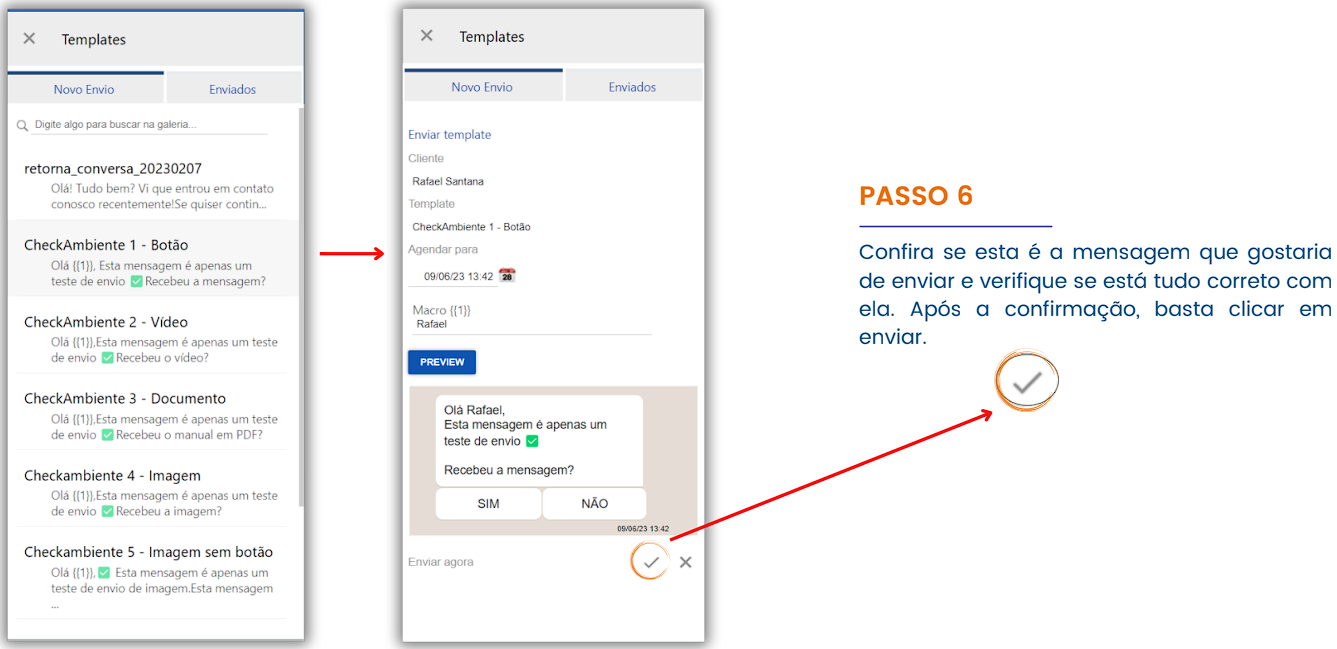
The message will be sent to the customer, and when they interact by accepting, a conversation can be initiated.
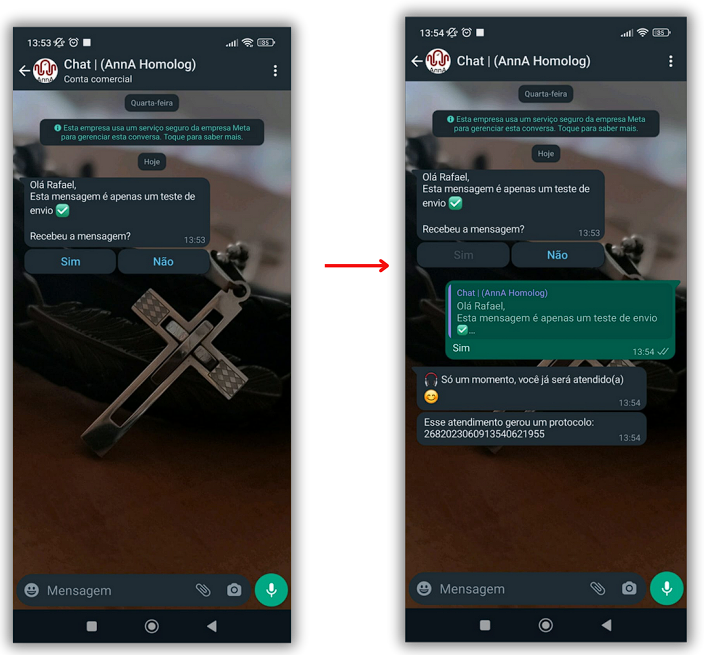
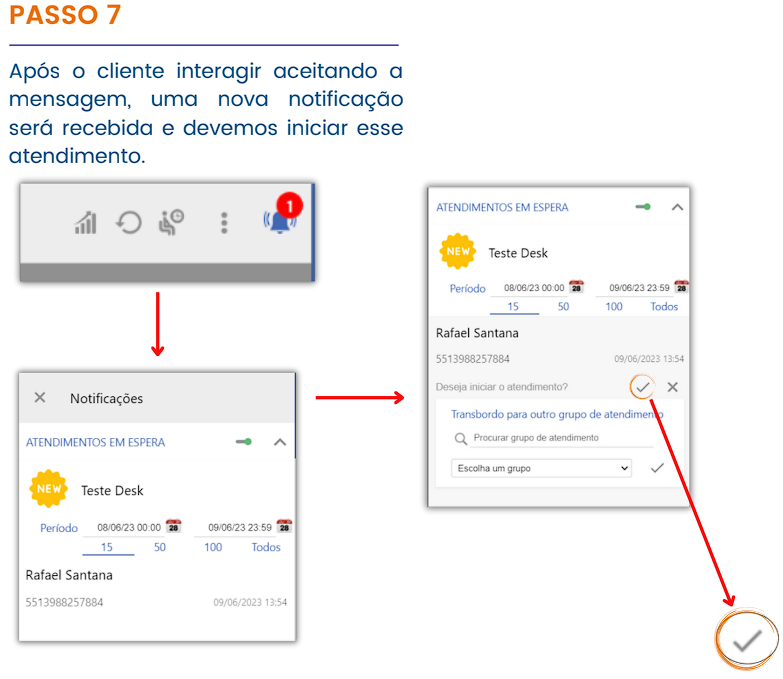
To carry out this type of sending, it’s necessary to create a service template and send the template. The service will only be initiated if the customer accepts the interaction positively. For example, if they click “no,” the conversation will not be started.
